
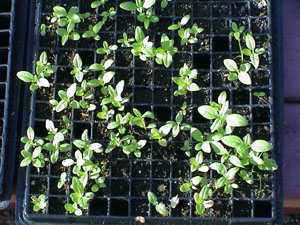
For ground grown plants we usually start a thousand seeds all at once in these great nursery trays which have 288 separate compartments. It takes a while to place seeds in each square but the transplanting is fast and keeps wasted space to a minimum. When the seedlings have at least two sets of leaves we transplant to larger containers. We use 16 ounce Dixie cups with several small holes drilled in the bottom for good drainage. The seedlings have long roots and must be kept moist so transplant and water soon after. We suggest you purchase the best potting soil available as this will greatly accelerate the growth of these seedlings. Growing times will depend on milkweed variety and your location. 7-14 days is typical for curassavica germination.
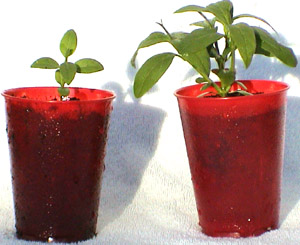
These are some of our growing containers. The seedling on the left is about 30 days old (from seed) and at this point should be pinched. That means the tiny new leaves at the top of the plant should be cut off. This cutting forces the plant to begin new growth from each joint. The plant on the right is about 40 days old and has 5 growth stalks which will provide far more leaves for your caterpillars and gives you a much fuller bush like Milkweed. Once the plants get going the growth is dramatic from week to week. Water only when the soil gets dried out or the plants begin to wilt after the seedling stage. When the roots completely surround the inside of the pot it is time for a larger container with good drainage. Good luck and thank you.
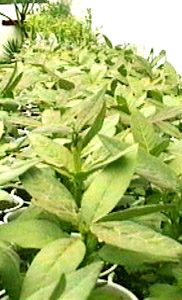
Here is a picture of 1000+ seedlings grown in 16 ounce plastic cups. It takes a lot of patient work! The plants in front are ready to be transplanted into larger containers. Use the best soil you can and buy a good fertilizer! It will more than pay for itself in the long run. Try worm casting for a more Natural alternative or compost.
Can you spot the 75 caterpillars in this picture? Don't worry. We can't either, but we pick off that many each day and transfer them to our larger plants.
The next section gives you some very helpful advice for caring for your plants and propagating more quickly.
Click below for a section on Advanced Caterpillar raising and common questions regarding possible problems and how to avoid them. Click here for answers
APHIDS / Spider Mites and how to easily get rid of them:
1. Unless you grow inside a laboratory, Aphids will find your plants :(
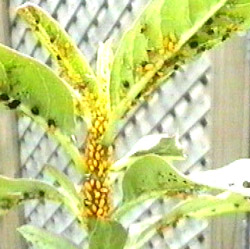
2. Unless your plants are hidden by these yellow orange suckers, the caterpillars
will not be disturbed by their presence. However they do stress the plant
and slow its growth. The plant pictured at left is very stressed!
3. Eliminating aphids completely is an ongoing battle, but you are much
larger and have the advantage. :)
In case you want to know, the oleander aphid is orange. It is the most common problem.
Methods of Removal
Try buying a bunch of Ladybugs or Lacewings. They work well or...
1. Every few days search milkweed for aphids if you see some cut
off the top of plant where they are throw it 5 feet away from your plants.
Thats it. The paracites that are attacking the aphids survive, fly
back to kill more. There are already several types of predators eating aphids commonly found in most areas of North America and by tossing them aside the aphids will die but may provide an ongoing food source for tiny wasps that may be already inside of the aphids...in a few days these aphid paracites hatch out and continue the war against the aphids. It is a war of numbers and you can easily turn the tide in your favor.
2. Squash them with your fingers. Yucky, but highly effective. Good for
a few, but you will have yellow fingers.
3. Remove the Monarch caterpillars and a few leaves to a separate container, and
spray plants with a mix of dish detergent and water in the shade, let sit a few minutes,
rinse plants several times and make sure dead aphids are off before placing
caterpillars back on plants. It is best to keep one safe plant for the caterpillars
so you can really make sure aphids are gone. Repeat weekly if necessary. Important to wash off soap residue so plant does not suffocate too. Do this out of direct sunlight.
The Mix: 3 tablespoons dish washing detergent (Dawn or similar) to a half gallon of water.
Use natural pesticides like garlic or neem oil only as a last resort. Beneficial insects like ladybugs are well worth the investment!
There are many safe and natural insecticides to buy which work very well. Just follow their directions carefully, and try to isolate your caterpillars from the treated plants for as long as possible. Please be very careful when using sprays or poisons around children, animals and nearby plants. Soap also kills the orange and black milkweed sucker bugs. Always remember your actions are important and you can easily save or kill important parts of our environment by your actions. Please search out the safest methods of accomplishing your goals and ask questions. There is no need to use a chemical compound once used to kill enemy combatants during a world war.